
As of 2025, Autodesk Revit is used by many in the design world, holding 35.20% of the market. One reason it’s so popular is because it helps create clear and consistent drawings. A big part of this is using line styles. In Revit, line styles help make your plans, sections, and elevations neat and easy to read. Each line’s thickness, colour, and pattern can change how your design is understood.
This article will show you what line styles are, how they work, and how you can create your own. You’ll also learn how to change and use them in your Revit projects to keep everything clear and organised.
What are Line Styles in Revit?
Add below image

In Revit, line styles control how lines look in your drawing—they decide the thickness, colour, and pattern of each line. These styles help make your drawings clear, neat, and understandable. You can use different line styles for different elements like walls, doors, windows, or notes, so it’s easier to tell things apart or show detail.
Revit gives you some ready-made line styles, like solid, dashed, or hidden lines. But you can also create your own styles to match your project’s needs. By organising and using line styles properly, you can keep a consistent look across all your drawings, which makes your design more accurate and professional.
Benefits of Line Styles in Revit
In Revit, line styles do more than just make your drawings look good—they are essential in making your designs clear and easy to understand. Whether you’re working on floor plans, structural drawings, or MEP-F layouts, using the right line styles helps you show the difference between elements, highlight what’s important, and follow drawing standards.
Adjusting line thickness, patterns, and colours can make your drawings more organised and easier to read. This helps teams review designs faster, avoids on-site confusion, and ensures everyone—from designers to contractors—understands the drawings in the same way.
Below are the key benefits of line styles in Revit:
- Consistency: Line styles help keep your drawings uniform by showing elements the same way across all views and sheets.
- Clarity: They make it easier to tell different parts of the design apart—like walls, doors, or hidden lines—so the drawings are easier to understand.
- Customisation: You can create your own line styles to fit the unique needs of your project, giving you more control over how things look.
- Efficient Documentation: Clear line styles make construction documents easier to read, which helps everyone understand the design better.
- Improved Visualisation: Using different line types—like dashed, thick, or thin—helps show design intent more clearly in model views.
- Easy Management: All line styles can be managed from one place in Revit so that you can update them quickly throughout the whole project.
- Standards Compliance: You can easily follow project or industry standards using built-in or custom line styles.
Creating a custom line style is just the beginning. To make it truly fit your project, you’ll need to explore how to customise its appearance and behaviour in Revit.
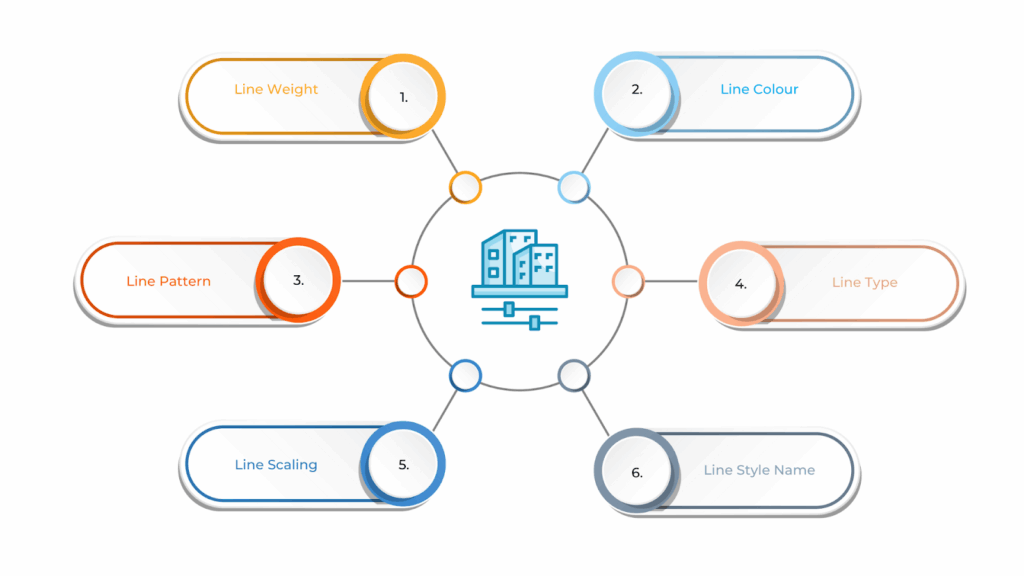
Components of Line Styles in Revit
Line styles in Revit comprise key parts that decide how lines look in your drawings and views. These parts work together to create a clear visual order, helping you show which elements are more important and making it easier for others to understand your design.
Each part has its own role. Line weight controls how thick or thin a line appears, which can show the importance or type of an element. Line colour helps you quickly recognise and group similar items.
On the other hand, line patterns, like solid, dashed, or dotted lines, make it easier to tell different kinds of objects or functions apart. Together, these components bring clarity and structure to your Revit drawings.
Below are the key components of line styles in Revit:
| Property | Key Details |
| Line Weight | Defines the thickness of the line, affecting how prominent it appears in views and printouts. |
| Line Colour | Specifies the colour of the line, allowing different elements to be visually distinguished. |
| Line Pattern | Determines whether the line is solid, dashed, or uses other patterns (e.g., centrelines, hidden lines). |
| Line Type | Defines the type of line, such as continuous, hidden, or dashed, based on its purpose. |
| Line Scaling | Allows the line style to adjust its appearance when switching between different view scales. |
| Line Style Name | A unique name for each line style, helping users identify and apply specific styles across the project. |
Before you start customising line styles, it’s essential to understand what Revit needs to set them up properly.
Ready to simplify your projects and achieve the benefits?
BIM ASSOCIATES is your one-stop BIM Solution provider for Revit Architectural and Structural Solutions. They coordinate with your team to develop, record, and streamline the BIM Revit Model, along with the sheets, Bill of Quantities, Bill of Materials, and clash coordination.
Requirements for Creating Line Styles in Revit

Creating line styles in Revit starts with knowing your project’s visual rules and how to use the tools in the software. Before you begin, ensure you’re working with the right project template, that visibility settings are set correctly, and that you can make changes.
It also helps you decide the line weight, pattern, and colour you want. This keeps your drawings consistent across all views and sheets. Below are the key requirements for creating line styles in Revit:
- Start with an Active Project: Before defining line styles, ensure you work in an open Revit project or template. This is where your line settings will be saved and used.
- Go to the Manage Tab: To create or edit line styles, head to the “Manage” tab. From there, you can open “Object Styles” or “Line Styles“—these tools let you manage how lines look in your project.
- Decide Line Thickness (Line Weight): Think about how thick each type of line should be. Thicker lines often show essential elements, while thinner ones are for details. Choosing the right thickness helps your drawings look clear and professional.
- Choose a Line Pattern: Do you want the line to be solid, dashed, or dotted? Pick a pattern that fits the purpose—like using dashed lines for hidden items or centrelines.
- Name Your Line Styles Clearly: When creating a new line style, give it a name that makes sense. This makes it easier for you and your team to find and use the right style later.
- Think About View Scales: Line styles should look good at different zoom levels. Whether printing a detailed floor plan or a big layout, ensure your lines stay readable and consistent.
- Follow Project Standards: Stick to rules your team or industry follows for line styles—like using certain colours, patterns, or weights. This keeps your drawings uniform and easy to understand.
Once you’re familiar with the basic requirements, you can start creating your own custom line styles.
Also read: Optimising Floor Plan Views in Revit with View Range Settings
Steps to Create a Custom Line Style in Revit

Creating your own line style in Revit helps you make your drawings look how you want. Maybe you need a dashed line for site boundaries, a thick line for columns or beams, or a special pattern for notes—Revit lets you choose how your lines look. By setting it up step by step, you can keep your drawings clear and consistent across all views and sheets.
This also makes it easier for your team to understand the design at a glance. In addition, using custom line styles can help you follow project standards or client requirements more easily. Below are the steps to create a custom line style in Revit:
- Open Your Revit Project: Start by opening the Revit project or template where you want to create your custom line style.
- Go to the Manage Tab: At the top of the screen, click on the “Manage” tab in the ribbon menu.
- Go to the Line Styles Tab: In the open dialog box, switch to the “Line Styles” tab. Here, you’ll see a list of all the line styles already in the project.
- Create a New Line Style: Click the “New” button on the right to make a new line style.
- Give It a Name: Type in a clear, descriptive name for your new line style—for example, “Dashed Fence Line” or “Property Border.”
- Set the Line Weight: Choose how thick the line should be. Pick from the existing line weight numbers or create a custom one, depending on how bold you want it to appear.
- Select a Line Pattern: Choose a line pattern that fits your need—like solid, dashed, or hidden. You can also create your own custom pattern if needed.
- Pick a Line colour: Select a colour from the palette or define a new one. This helps visually separate line styles in your drawings.
- Save the Style: Click OK to save your new line style. It’s now part of your project and ready to use.
- Use Your Custom Line Style: You can now apply this line style to different elements in your project by selecting them and changing the line style from the Properties palette.
After creating a custom line style, you can take it a step further by adjusting how it looks and functions.
Customising Line Options in Revit

Revit gives you flexible tools to customise lines so your drawings stay clean, clear, and professional. You can adjust the thickness (line weight), change colours, and even create your own line styles and patterns to match your project’s look and standards.
These customisations aren’t just for appearance—they also help organise information, highlight important details, and make it easier to tell different building elements apart at a glance.
Here are the main ways you can control and customise line styles in Revit to keep your drawings easy to read in both views and printed sheets:
Line Weight
In Revit, you can control how thick or thin a line looks by changing its line weight. Thicker lines usually stand out more, while thinner lines are more subtle. This helps in showing which parts of your drawing are more critical. You can choose from Revit’s default line weights or create your own in the Line Styles settings.
Line Pattern
Line patterns are the styles of the lines—like solid, dashed, or dotted. Revit gives you different options to use, depending on what you want to show. For example, hidden objects might use dashed lines. If you need something specific, you can even create your own pattern using the Line Pattern editor in the Manage tab.
Line colour
Line colour can help make your drawings easier to read. In Revit, you can change the colour of lines to show different elements or to match your project’s style. This can be done through Line Styles, and it helps organise your drawings visually.
Line Type
The type of line—whether it’s a straight solid line or a broken dashed one—can be used to show different things in your design. Revit lets you choose the line type based on your drawing, like walls, doors, or measurements. This way, your drawings clearly communicate what each element is.
Line Scaling
Revit automatically adjusts how lines look depending on the scale of your drawing. So, if you zoom in or out or print at a different size, the lines will still look clean and easy to understand. For example, a dashed line won’t turn into a messy blur when you change the scale—it adjusts to stay readable.
Object-Specific Line Styles
Different objects in your model, like walls or windows, can each have their own line style. Revit lets you set these up so model lines (the actual building parts) and annotation lines (notes or symbols) look how you want. This helps keep your drawing organised and professional.
Overrides
Sometimes, you may want to change how a line looks in just one view without affecting the whole model. Revit allows you to override line styles for specific elements in a single view. For example, you might want to make a certain beam bolder in a structural view—this tool lets you do that easily.
Visibility and Graphics
To control how your drawings look even more, you can use the Visibility/Graphics settings. These let you show or hide certain elements and also change their line styles just for that view. It’s a powerful way to make your drawings cleaner and focus only on what matters for each sheet.
Once your line styles are customised to match your design preferences, the final step is knowing how to use them effectively throughout your project.
Using Custom Line Styles in Revit
Using custom line styles in Revit helps you create clean, organised, and professional drawings. Whether you’re following a client’s requirements or general industry standards, these line styles help set things apart visually and make your design easier to understand.
They improve the clarity of complex layouts and reduce the chances of misinterpretation. In addition, they make it easier for teams across different disciplines to stay on the same page. Here’s how custom line styles can be used effectively in your Revit project:
Establishing a Visual Hierarchy
Custom line styles help highlight what’s important in your drawings. Thicker lines can emphasise key elements like walls or columns, while thinner ones are suited for secondary details like dimensions or notes.
Dashed lines work well for hidden or existing features such as underground utilities. This visual layering makes your drawings clearer and easier to interpret.
Tailoring Line Styles to Project Standards
Each project comes with its own set of requirements—whether based on local codes or client preferences. Revit lets you adjust line weights, patterns, and colours to match these standards. Whether you’re designing architectural layouts or MEP-F plans, customised line styles ensure consistency and professionalism across all drawings.
Improved Communication
Clear line styles make it easier to explain complex designs. Dashed lines can show hidden features or elements that are not yet built but are still relevant. You can also use specific patterns for centrelines or construction lines, helping engineers, contractors, and other team members quickly understand the design intent.
Adapts to Different View Scales
Line styles can automatically adjust to suit the scale of your view. Whether you’re working on a broad floor plan or a detailed section, lines remain crisp and legible. This helps maintain clarity regardless of the zoom level or drawing size.
Allows Custom Line Patterns
Beyond thickness and colour, you can also create unique line patterns. For example, a custom dashed line with set spacing can represent wiring, plumbing routes, or ductwork. These tailored patterns improve recognition and accuracy in technical drawings.
Enhances Print Quality
Custom line styles ensure your drawings remain sharp and well-organised when exporting to PDF or printing. Consistent line weights and patterns minimise confusion and preserve the intent of your design in physical formats.
Enables Efficient Updates
Using custom styles across your project makes edits more efficient. A change in line colour or weight in one place automatically updates all related views. This saves time and ensures uniformity throughout the documentation.
Setting Up Custom Line Styles
To create and apply a custom line style in Revit, start by going to the Manage tab and selecting Object Styles. In the Line Styles tab, click New to create a new style. You can then define the line weight, pattern, and colour according to your project’s needs.
Make sure to give the style a clear and recognisable name so it’s easy to identify later. Once the style is created, apply it to any element by selecting the object and choosing your custom line style from the Properties palette.
BIM Supports GREEN EARTH.
Conclusion
Custom line styles in Revit help make your drawings clearer and more organised. You can choose the line weight, pattern, and colour to match your project’s needs, making it easier to show important details.
Using line styles gives your drawings a clear structure. It helps highlight key elements and keeps everything looking consistent across all views and sheets. When you learn how to create and use custom line styles, your Revit projects look more polished, professional, and accurate.
Are you looking for BIM solutions?
BIM ASSOCIATES is your one-stop BIM Solution provider for the Architecture and Structure discipline. Their solutions help clients with better decision-making, cost-saving, efficient construction planning, and green earth initiatives.
You might also like: Autodesk Revit Viewer: Features, Access, and How to View Your Flies
FAQs (Frequently Asked Questions)
1. How to add model lines in Revit?
Go to the “Annotate” tab and click “Model Line.” Choose a line style, then draw on any plane. Model lines appear in 3D views and stay with the model, not just a sheet.
2. How to add line style in Revit?
Open the “Manage” tab and click “Additional Settings,” then select “Line Styles.” Click “New” to create a style, name it, and pick line weight, colour, and pattern.
3. How do I create different line types in AutoCAD?
Type LINETYPE in the command bar, then click “Load.” Pick a line type from the list or add your own. Use Properties or LTSCALE to apply it and adjust the size.