Bringing Revit models into SketchUp can be tricky because the two programmes use different file formats and work in different ways. However, you can make the transition smoother by exporting your Revit model in a compatible format like DWG or IFC.
Organising layers properly and removing unnecessary elements before importing them into SketchUp also helps keep the model clear and easy to work with.
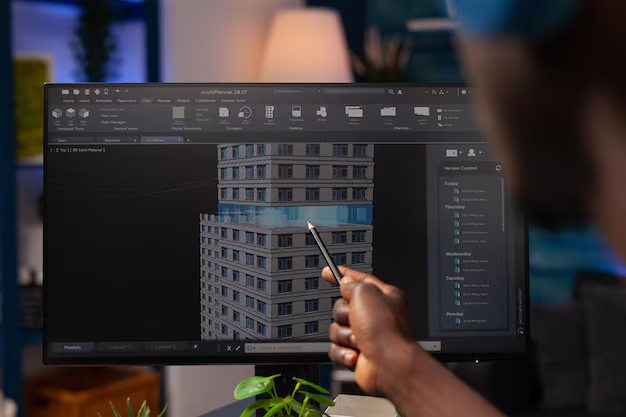
In this article, you’ll learn the steps to import SketchUp files into Revit. In addition, you’ll explore useful tips to get the best results from Revit’s importer and how to handle common issues that may come up.
How to Import a File from Sketchup to Revit?
SketchUp and Revit are both popular tools in architecture and construction, but they are used for different tasks. SketchUp is great for quick and easy 3D modelling, while Revit is a BIM (Building Information Modelling) software used for detailed design and project coordination.
Because they work differently, moving a model from SketchUp to Revit takes some preparation. Choosing the right file format and cleaning up the model beforehand can make the process smoother.
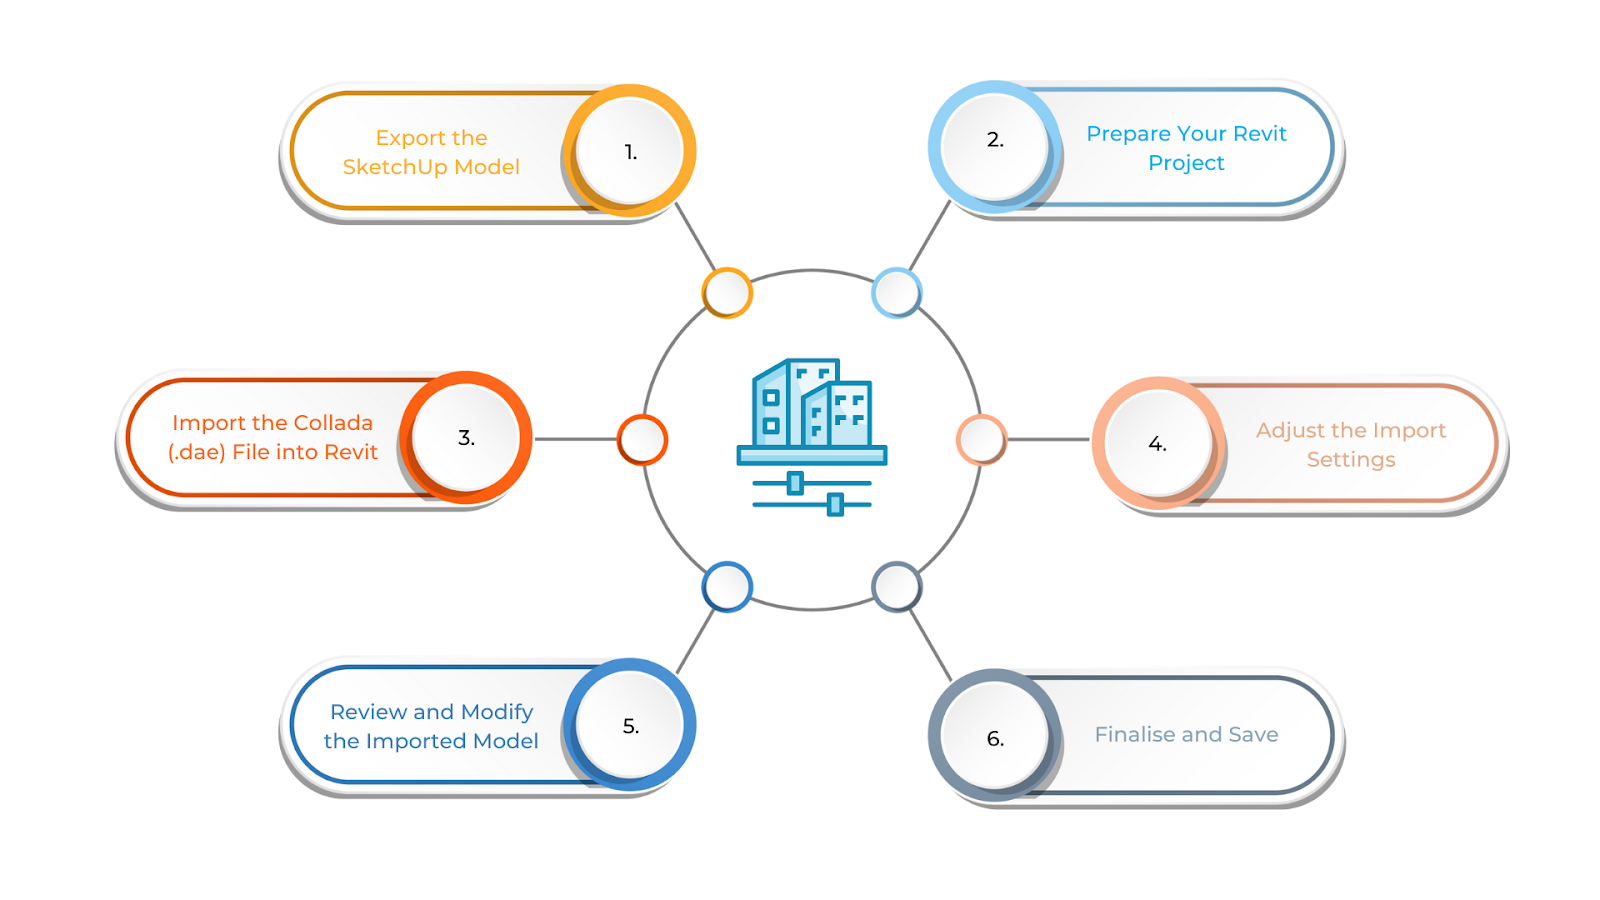
If you’ve created a model in SketchUp and need to use it in Revit, knowing how to import it properly will help ensure a smooth workflow. Below are the steps to import a file from Sketchup to Revit:
- Export the SketchUp Model
Open your SketchUp file and ensure the model is complete and ready for export. To export, navigate to the File menu, select Export, and choose 3D Model. In the export window, select Collada (.dae) as the file format, choose a destination folder, and save the file.
Collada files are widely compatible and help transfer geometry and textures from SketchUp to other software, including Revit.
- Prepare Your Revit Project
Open Revit and start a new project or open an existing one where you need to import the SketchUp model. Before proceeding, check the unit system in Revit and ensure it matches the units used in SketchUp. This step is crucial to avoid scaling issues during the import process.
- Import the Collada (.dae) File into Revit
In Revit, navigate to the Insert tab and click on Import CAD in the Link panel. In the Import CAD Formats window, go to the folder where you saved the Collada (.dae) file, select it, and click Open to begin the import process.
- Adjust the Import Settings
After selecting the file, a settings window will appear with various import options. For Positioning, choose between Origin to Origin or Centre to Centre to make sure the model is placed correctly in your project. Check the Scale settings to match your Revit project units, whether metric or imperial.
You can also keep the layers and colours from the SketchUp model, which can help with visibility and organisation within Revit. Once everything is set, click OK to import the model.
- Review and Modify the Imported Model
After the model is imported, review its placement and adjust its scale and position if necessary. If needed, convert imported geometry into Revit families for better editing and organisation. You can also modify materials and textures to align with Revit’s rendering capabilities for a more accurate visual representation.
- Finalise and Save
Once the imported model is positioned properly and adjusted, save your Revit project to ensure all changes are retained. You may also consider linking the imported file or converting specific components into Revit families for better model management.
Now, your SketchUp model is successfully integrated into Revit and ready for further development. Once you’ve imported your SketchUp file into Revit, ensure it works as expected.
Also read: Revit Tutorial: Elevation Views, Levels, and Spot Elevations Guide.
Six Tips to Maximise the Revit Importer
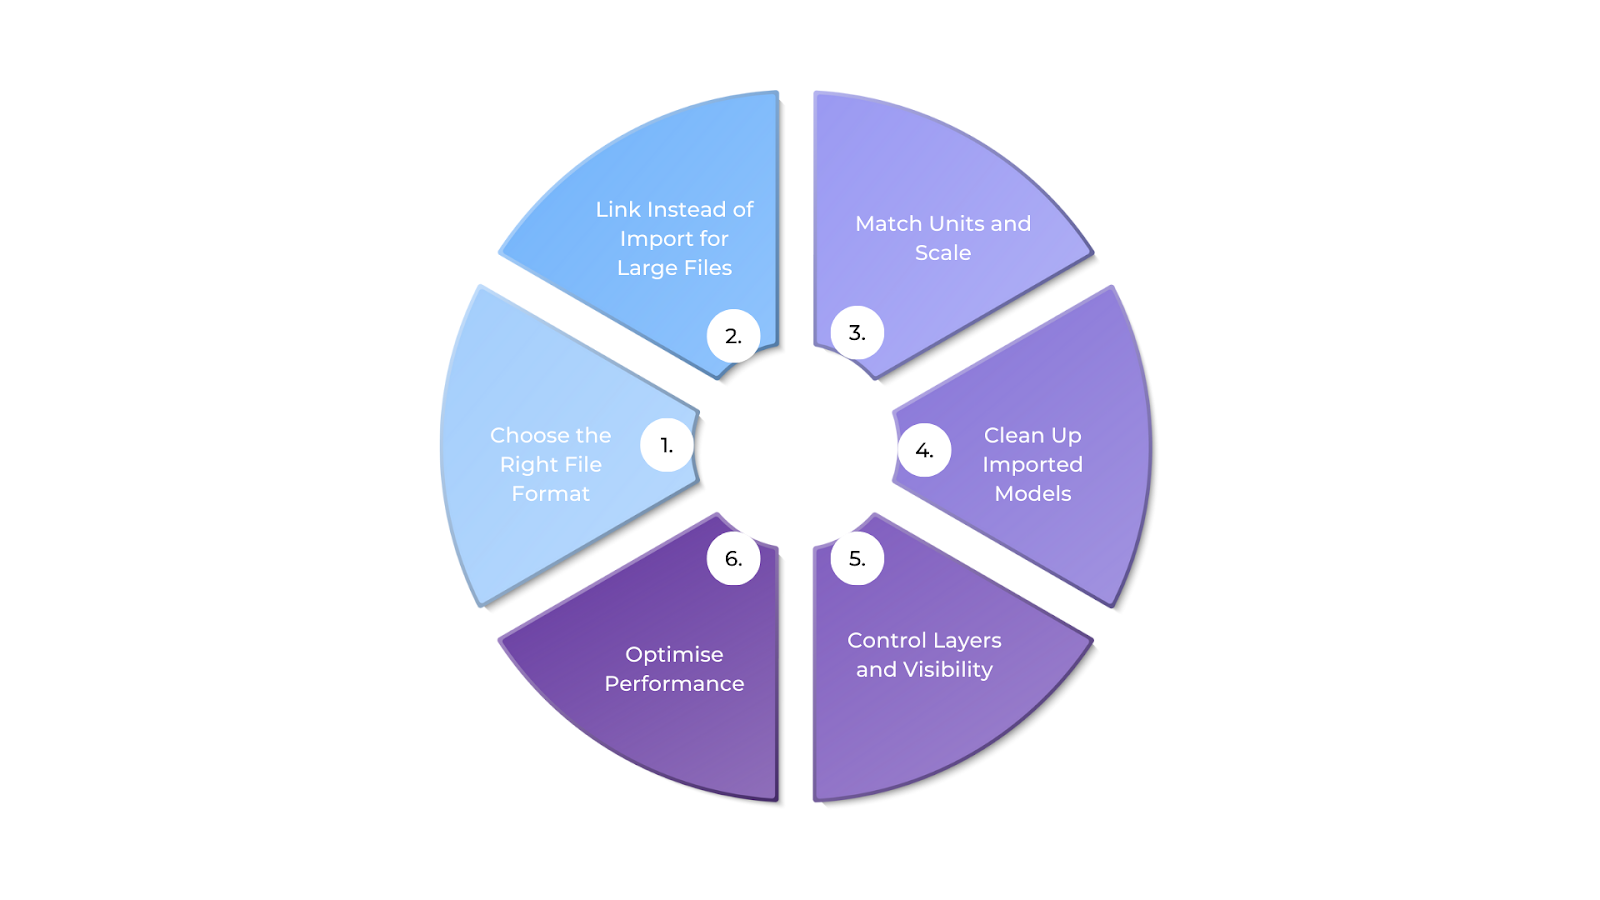
Bringing files into Revit is an important step when you’re working with models from SketchUp, AutoCAD, or other design software. But simply importing a file isn’t enough. The process needs to be optimised for better performance, accuracy, and workflow efficiency to get the best results.
Keeping the geometry clean, selecting the right file format, and making small adjustments can greatly improve how well the imported model works within Revit. Below are the six tips to maximise the Revit importer:
- Choose the Right File Format
Revit supports formats like DWG, DXF, SAT, SKP (SketchUp), FBX, and IFC, each serving different purposes. SKP files are best for quick 3D imports, DWG/DXF for AutoCAD drawings, and IFC for BIM workflows. Selecting the right format ensures smoother integration.
- Link Instead of Import for Large Files
Linking files instead of importing them improves performance and allows easy updates. If the original file changes, simply reload the link in Revit. This method also keeps file management organised. To link a file, go to Insert > Link CAD or Link IFC.
- Match Units and Scale
Before importing, ensure the unit system in Revit matches the source file to prevent scaling issues. SketchUp and AutoCAD models may use different units, so checking and adjusting beforehand saves time. Revit also provides rescaling options during import if needed.
- Clean Up Imported Models
Extra geometry, layers, or references can make your project slower. Before importing, clean up your SketchUp model by removing unnecessary parts and deleting unused layers or blocks in AutoCAD. Revit lets you choose which layers to import, helping keep the model organised.
- Control Layers and Visibility
Revit’s import options let you select the layers you need, keeping the model clean and easy to work with. After importing, you can adjust visibility settings to stay organised and improve workflow.
- Optimise Performance
For large models, split them into smaller parts, use simplified versions, or link instead of importing to reduce system load. These steps keep Revit running smoothly and maintain an efficient workflow.
By following these tips, you can maximise the functionality of the Revit Importer, maintain a clean and organised model, and ensure smooth performance even with large and complex files.
Even with the best import settings, you might still encounter missing geometry, scaling problems, or unexpected errors.
Ready to simplify your projects and achieve the benefits?
BIM ASSOCIATES is your one-stop BIM Solution provider for Revit Architectural and Structural Solutions. They coordinate with your team to develop, record, and streamline the BIM Revit Model, along with the sheets, Bill of Quantities, Bill of Materials, and clash coordination.
Overcoming Import Limitations: Key Strategies for Importing Files into Revit
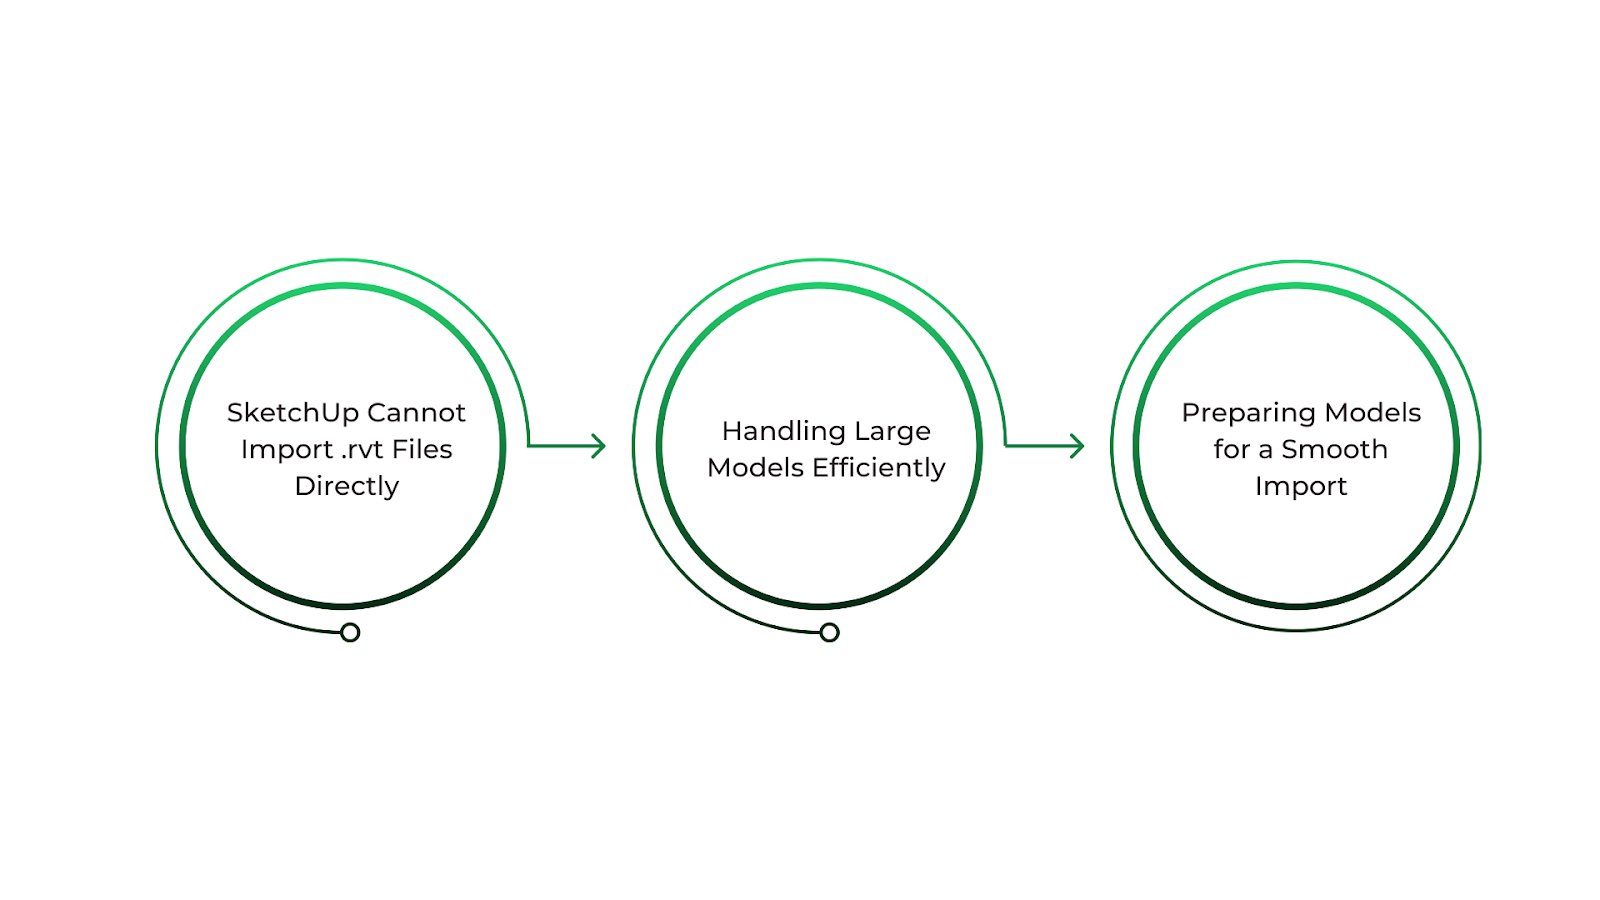
When you’re using SketchUp and Revit together, it’s important to understand the limits of importing files between them. SketchUp cannot directly open Revit (.rvt) files, which can make it tricky for users who want to bring their SketchUp designs into Revit.
Large models or highly detailed geometry can also cause issues during import, leading to slow performance or missing parts. To prevent these problems, here are some effective solutions:
- SketchUp Cannot Import .rvt Files Directly
SketchUp does not support Revit’s .rvt files; there is no direct way to convert them. To transfer designs, export the SketchUp model in a format that Revit accepts, such as Collada (.dae), DWG, IFC, or SAT. This helps maintain geometry and some metadata during import.
- Handling Large Models Efficiently
Models with too much geometry, textures, or layers can slow down Revit or cause import problems. Choosing the right file format can help—Collada (.dae) keeps 3D shapes and textures, DWG is good for CAD drawings, IFC works well for BIM projects, and SAT (ACIS) is best for complex solids.
Instead of importing large files directly, use Revit’s Link CAD feature to improve performance and make updates easier.
- Preparing Models for a Smooth Import
Overly detailed models can cause errors or slow down Revit. To keep things running smoothly, simplify the geometry by removing extra details, deleting unused components, and reducing high-resolution textures. Splitting large models into sections, like floors or building zones, also makes them easier to manage.
Using low-polygon models helps Revit handle early design stages better, with details added later. Running SketchUp’s Check Model tool before export can catch and fix issues for a smoother import.
Even with these strategies, some import problems can be hard to fix with Revit’s built-in tools alone. This is where plugins and third-party software can help.
Use of Plugins and Third-party Tools for Importing SketchUp Files into Revit

Bringing SketchUp models into Revit can be tricky, but third-party tools and plugins can make the process much easier. These tools help improve compatibility, boost performance, and create smoother workflows.
From file conversion to advanced features, they offer various solutions to overcome the limitations of native file formats. Here’s how to get the most out of these tools for a smooth SketchUp-to-Revit integration:
- Tools Like Trimble Connect and Helix for File Conversion
Trimble Connect and Helix are great options for converting SketchUp files into formats that work better with Revit.
Trimble Connect lets you upload SketchUp models and convert them into formats like IFC or Collada (.dae), making it easier to bring them into Revit. Since it’s cloud-based, it also helps with collaboration.
On the other hand, Helix simplifies the process by converting SketchUp files into formats like DWG or Collada. It helps maintain geometry and ensures models work smoothly in Revit.
- SketchUp Studio for Revit Compatibility
SketchUp Studio is a great option for those who frequently switch between SketchUp and Revit. It provides export options that improve compatibility with BIM workflows. It also allows direct exports to Collada (.dae), which Revit can easily import.
The IFC export feature helps transfer geometry and metadata, making it more useful for BIM projects.
- Free and Paid Plugins for Better File Compatibility
Several free and paid plugins can simplify the import process and improve file compatibility. This list includes:
- SimLab SketchUp Exporter: Helps export SketchUp models into formats that Revit supports, such as Collada (.dae). It’s useful for small to mid-sized projects.
- Revit’s Built-in Import/Link Tools: Basic Revit functions for linking CAD files and importing SketchUp models in DWG format. Works for simpler models.
- Helix: Optimises SketchUp-to-Revit imports, preserving geometry and materials while speeding up the process.
- SimLab 3D PDF Exporter: Converts SketchUp and Revit models into interactive 3D PDFs, helpful in sharing models with non-Revit users.
- BIMOne’s Revit Importer: Powerful tool for bringing IFC files into Revit, making it ideal for large BIM projects that require accurate data transfer.
While plugins and third-party tools can simplify the import process, they can also impact your project’s performance.
Performance Considerations for Revit File Imports
Revit is a powerful tool, but importing large files—especially from SketchUp, AutoCAD, or other BIM software—can slow it down. You might notice lag, crashes, or slow response times when handling big or detailed models.
Revit has to process all the geometry, layers, and textures, which can overload the system. Poorly optimised models can also lead to longer load times and difficulty making edits.
Luckily, there are ways to avoid these problems and smooth your workflow. Below are some key tips to improve performance when importing large files into Revit:
- Handling Large File Imports Without Performance Issues
Importing large models with complex details or many linked files can slow Revit down, causing lag, delayed rendering, or crashes. This often happens due to excessive model size or unnecessary elements. The effective solutions include:
- Import Only What You Need: Export only essential parts of SketchUp, AutoCAD, or other models instead of the entire file, reducing unnecessary load.
- Use Lightweight File Formats: Formats like Collada (.dae) or DWG are easier for Revit to handle than heavier ones like FBX or 3D DXF.
- Adjust Import Settings: Lower the level of detail, tweak the scale, or hide unnecessary elements to reduce system strain.
- Use Linked Files Instead of Direct Imports: Linking models keep them separate from the main file, improving performance.
- Manage System Resources and Avoid RAM Limitations
Revit can use up many system resources, especially when working with big BIM projects. If your computer doesn’t have enough RAM or processing power, it might slow down or crash. Managing system resources properly can help avoid these problems. The effective solutions include:
- Upgrade Your RAM: Revit runs much better with more RAM. If you’re working with large models, 16GB or 32GB of RAM (or more) is recommended.
- Close Other Programmes: Running too many applications at the same time can make Revit slower. Close unnecessary programmes so Revit has more memory to work with.
- Optimise Revit Settings: Turn off features like real-time rendering and reduce visual styles. This won’t affect your work but will make Revit run faster.
- Use a Dedicated Graphics Card: A good GPU (graphics processing unit) helps a lot, especially when dealing with large, detailed models. Use a dedicated GPU instead of built-in graphics.
- Monitor System Performance: Keep an eye on your CPU and RAM usage while importing files. If your system struggles, you may need to adjust settings or upgrade hardware.
- Split and Link Large Models for Better Performance
When you’re working with large models, break them into smaller parts to make a big difference. You can work with manageable sections instead of loading everything at once, reducing Revit’s workload. The effective solutions include:
- Split Models by Components: Instead of importing an entire building into one file, break it down by floors, sections, or zones. For example, import each floor separately and link them together in Revit.
- Use Worksets: Worksets allow you to divide a project into sections like structure, architecture, and mechanical parts. This way, you only load what you need at any given time, improving performance.
- Link Files Instead of Importing: Linking models instead of importing them directly keeps the main Revit file smaller and easier to manage. Linked models can also be updated separately, making collaboration smoother.
- Control File Visibility: You don’t always need to see the entire model. Revit lets you hide parts of linked files so you only display what’s needed. This makes the software run faster.
- Coordinate Model Sections: If your project is large, consider dividing it into separate sections and linking them together in the main model. This approach keeps each file manageable and avoids performance issues.
BIM Supports GREEN EARTH.
Conclusion
Bringing Revit models into SketchUp can be tricky because the two programmes use different file formats, and Revit models can be complex. You can use formats like Collada, DWG, or IFC to make the process smoother or rely on tools such as Helix and Trimble Connect.
Software tools and community support play a big role in solving technical issues. Plugins and online forums offer helpful tips and support troubleshooting. Staying open to learning and adapting to new tools is essential for working efficiently, keeping up with changes, and improving collaboration.
Are you looking for BIM solutions?
BIM ASSOCIATES is your one-stop BIM Solution provider for the Architecture and Structure discipline. Their solutions help clients with better decision-making, cost-saving, efficient construction planning, and green earth initiatives.
You might also like: Discover the Uses of Revit for Architecture, Structural, and MEPF Design.
FAQs (Frequently Asked Questions)
1. Can you open a Revit model in SketchUp?
Revit and SketchUp do not use different file formats directly. To open a Revit model in SketchUp, you must first convert it into a compatible format like DWG, IFC, or Collada. You can do this using Revit’s export options or third-party tools.
2. How to open a Revit model without Revit?
If you don’t have Revit, you can use free tools like Autodesk Viewer to view the model online. Another option is to ask someone with Revit to export the model in a format like DWG or IFC, which you can open in other programmes like SketchUp, AutoCAD, or BIM viewers.
3. How to explode a Revit model in SketchUp?
You can use SketchUp’s Explode option once you import the Revit model into SketchUp (using a compatible format). Right-click on the imported model and select Explode to break it into smaller parts. You may need to do this multiple times to edit individual elements.