
Over 14.71% of professionals in the UK, USA are already using Dynamo, highlighting its growing popularity in the construction industry. If you’ve ever wanted to make repetitive tasks in Revit faster and more efficient, Dynamo offers a perfect solution.
It gives Revit users many possibilities, making repetitive tasks easier with visual programming. Whether you’re new to Dynamo or aiming to automate repetitive processes, creating your first script is an exciting step toward improving your design efficiency.
This article covers everything you need to know to create your first Dynamo script. You’ll understand the core components of scripts and learn the workflow. In addition, you’ll discover how to work with nodes and expand functionality.
Understanding Revit Dynamo Scripts

Dynamo is called an open-source visual programming tool that works seamlessly with Autodesk Revit. It allows you to create scripts to control and modify elements in your Revit project by managing a data flow. Instead of traditional coding, Dynamo uses a node-based interface, allowing you to connect blocks (nodes) to build scripts.
In the context of Revit, a Dynamo script is a series of interconnected nodes designed to address specific challenges or automate tasks within the software. These scripts handle a variety of functions, from arranging objects in a set pattern to generating parametric models, designing custom workflows, or managing complex building data.
By integrating Dynamo scripts into Revit workflows, you can unfold a range of capabilities that simplify design and enhance project efficiency.
Key Benefits of Dynamo Scripts in Revit
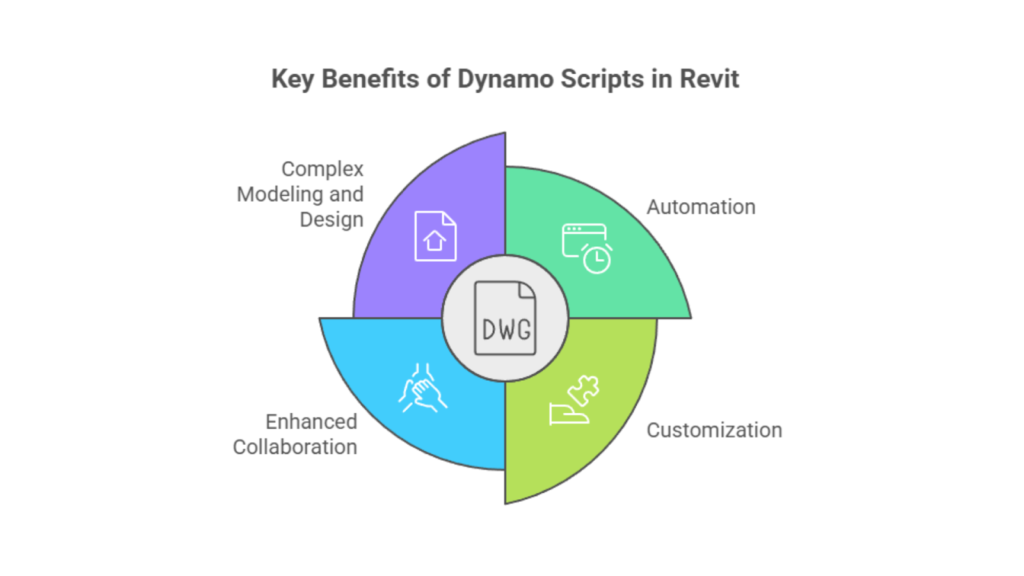
Dynamo scripts provide Revit users with a powerful tool to boost efficiency and creativity. Whether it’s managing data, optimising design elements, or generating complex geometry, Dynamo allows you to expand the possibilities within Revit.
The key benefits of Dynamo scripts in Revit are as follows:
- Automation: Tasks like placing elements, creating schedules, or updating parameters that might take hours manually can be completed in minutes with a well-crafted script.
- Customisation: Dynamo scripts enable you to build workflows and solutions tailored to your project’s needs. Whether you automate repetitive tasks or generate intricate designs, the possibilities are nearly limitless.
- Enhanced Collaboration: Dynamo scripts simplify processes, helping different team members working in Revit collaborate more efficiently. Effective data management can improve coordination and minimise errors on large projects.
- Complex Modelling and Design: Dynamo allows you to create advanced parametric designs beyond standard Revit tools’ capabilities. This is especially valuable for architects & engineers who need a high degree of customisation.
While the benefits of Dynamo scripts highlight their impact, understanding their core components offers a clear picture of how they work and contribute to efficient workflows in Revit.
Components of Dynamo Scripts
A Dynamo script has several key components, each contributing to its functionality. These components work in harmony to create dynamic, efficient automation scripts tailored to specific tasks. The components of Dynamo scripts include:
1. Nodes
Nodes are called the fundamental building blocks of a Dynamo script. Each node performs a specific function or operation, such as drawing a line, modifying a parameter, or transforming an object. They are grouped into categories based on their function and purpose, making it easier to find & use them. Some common types of nodes include:
| Nodes | Key Details |
| Geometry Nodes | These nodes create and manipulate geometric shapes like lines, circles, or solids. |
| Data Nodes | These nodes handle numbers, strings, or lists. You can use a data node to define an element’s length or specify the type of material used. |
| Revit-Specific Nodes | These nodes connect to Revit’s database, letting you create, edit, or retrieve model elements like placing doors, updating values, or extracting data. |
2. Wires
Once your nodes are in place, the next step is to connect them using wires. Wires represent the data flow between nodes, carrying information from one to the next. You can instruct Dynamo on how data should move through the script by connecting a wire from one node to another.
For instance, if you want to calculate the area of a room based on its dimensions, you could connect a node that defines the room’s length to another node that calculates the area. The wire tells Dynamo to use the data from the first node (length) as input for the second node (area calculation).
3. Inputs and Outputs
Each node in Dynamo can have one or more inputs and outputs. Inputs are the values or data a node needs to perform its function. For example, a node that creates a rectangle might require inputs for its length and width.
However, outputs are the results or data a node generates after completing its function. For instance, a node that places a wall in Revit will output the wall element into the model.
The inputs and outputs connect nodes to form a continuous data flow, allowing one operation to feed into the next. This creates a script that processes data in stages, making it possible to automate complex tasks without writing extensive lines of code.
This seamless data flow between inputs and outputs is made possible by nodes, the building blocks of every Dynamo script.
Also read: Autodesk Revit 2025 Features & Benefits: A Detailed Guide.
Working with Nodes

When using Dynamo, nodes are the fundamental building blocks of your scripts. Each node indicates a specific function or operation, and together, they automate tasks and manipulate data in Revit. Understanding how to connect and use these nodes effectively is key to fully leveraging Dynamo’s capabilities.
Connecting Nodes
Connecting nodes is a key step in creating a functional Dynamo script. Each node performs a specific task, and connecting them creates a logical flow of operations within your script. To connect Nodes, follow these steps:
- Drag and Drop: Place a node on the workspace. After placing, click one node’s output socket (the small circle on the right side) and drag a wire to another node’s input socket (the small circle on the left side).
- Data Flow: Data flows through the wire from one node to the next, with each node processing the information. For example, you may first use a node to define a parameter value and then connect it to a node that applies that value to elements in your Revit model.
- Order Matters: The sequence in which you connect nodes is essential. If nodes are connected out of order, your script may not work as expected. So, ensure that the output of one node is the correct input for the next in the sequence.
Establishing clear connections between nodes is crucial for a functional script, but clarity doesn’t stop there. Renaming nodes is equally important in maintaining an organised and understandable workflow.
Renaming Nodes
As your scripts become more complex, it can be challenging to track the function and purpose of each node, especially when using many similar ones. Fortunately, Dynamo lets you rename nodes for improved clarity and organisation.
Renaming nodes enhances readability and ensures that the person reviewing your script can easily understand the role of each node. To rename nodes, do the following:
- Double-click the Node: Simply double-click the node’s name in the workspace. A text box will appear to enter a new name.
- Choose Descriptive Names: It’s best to choose a name that reflects its function in the script. For example, instead of using the default name “Point.ByCoordinates,” you might rename it to something more specific, like “Wall Start Point” or “Light Fixture Location.”
Renaming nodes enhances clarity within a script, making it easier to follow and debug. Beyond renaming, familiarity with the Nodes Library is essential for discovering the wide array of pre-built functionalities to streamline your work.
Nodes Library
The Nodes Library is an essential part of the Dynamo interface, located on the left side of the workspace. It contains all the nodes available for use in your scripts. These nodes are organised into categories based on their functionality. To use the Nodes Library:
- Browse Categories: The library is divided into categories like “Core,” “Revit,” “Geometry,” and “Data,” each containing nodes related to that specific function.
- Search for Specific Nodes: If you know the node name you need, you can use the search bar at the top of the Nodes Library to quickly locate it.
- Preview Node Functionality: Hovering over a library node will briefly describe its function, helping you decide if it’s the correct node for your script.
You can even use custom community packages and input nodes to enhance your Dynamo scripts. These elements expand your script’s functionality, offering a more personalised experience and allowing you to tackle complex tasks more efficiently.
This level of customisation paves the way for expanding script functionality, enabling users to achieve even greater versatility and efficiency in their workflows.
Expanding Script Functionality
A standout feature of Dynamo is its active and supportive community, which contributes a variety of custom packages to extend Dynamo’s native capabilities. These packages include pre-built nodes designed to solve specific problems, automate tasks, or integrate with other software.
Use Custom Community Packages
The Dynamo Package Manager lets you browse and install community packages directly from the Dynamo interface. To access it, click the “Packages” tab and select “Search for a Package.” You can then search for specific packages based on your needs.
There are different categories of custom packages, such as:
| Custom Package Category | Key Details |
| Revit-Specific Packages | These packages offer nodes that provide deeper integration with Revit, allowing advanced control over parameters, views, and elements. |
| Geometry and Design Packages | These packages include advanced nodes for creating geometry, such as tools for parametric design, 3D modelling, and structural analysis. |
| Data Manipulation Packages | Some packages are designed for handling data, including functions for sorting, filtering, and transforming data within Dynamo. |
Custom community packages bring a wealth of pre-built functionality, but the true power of a Dynamo script often lies in how you input and manage data. Understanding input nodes is key to controlling the flow of information and ensuring your script performs as intended.
Input Nodes
Input nodes are essential in Dynamo scripts as they define the data that drives the operations within the script. These input nodes serve as the foundation of the script, providing the dynamic elements that shape the behaviour of the entire workflow. This flexibility makes it easier to adapt the script to different scenarios or requirements without needing to rewrite or overhaul the entire setup.
There are different types of input nodes, each serving a unique purpose:
| Category | Node | Key Details |
| Basic Input Nodes | Number Slider | Used to set numerical values through a slider, controlling parameters like distance, size, or counts within your Revit model. |
| String | Input text-based data, such as labels or names, are often used for labelling or tagging elements in your model. | |
| Boolean | Accepts true or false values, which is helpful in toggling between options or controlling conditions within your script. | |
| Revit-Specific Input Nodes | Element Types | Specifies the types of Revit elements (e.g., wall types, door types, materials). |
| Views and Filters | Defines Revit views or filters to apply to data, controlling visibility and enabling specific operations on selected views. | |
| Geometry Input Nodes | Point.ByCoordinates | Defines points in space by specifying X, Y, and Z coordinates, creating reference points for geometry. |
| Curve.ByPoints | Defines a curve using a series of points, which can be manipulated or extended with other nodes. | |
| List-Based Inputs | List.Create | Allows input of multiple values at once, creating a list of data to generate repetitive elements (e.g., multiple doors or windows). |
Once you’ve set up your input nodes, it’s important to consider how and when your script will run.
Dynamo Execution Modes
Dynamo offers two main execution modes: Manual Mode and Automatic Mode. These modes determine when and how your scripts are executed. Understanding each mode will help you select the most efficient execution style for your project, minimising errors and improving workflow.
Manual Mode
In Manual Mode, Dynamo scripts are executed only when you choose to run them. This gives you complete control over when the script is triggered, allowing you to review changes, adjust inputs, and make updates before executing the script.
Manual Mode ensures that each change is intentional and thoroughly reviewed before being applied to your Revit model. To run a script in Manual Mode, click the Run button at the top of the Dynamo interface. This will start the execution of the script.
Automatic Mode
In Automatic Mode, Dynamo scripts run automatically whenever changes are made to the Revit model. When you adjust a parameter or element that affects the script, Dynamo will automatically execute the required operations to update the model.
For example, if you change a parameter or move an object referenced by the script, Dynamo will automatically update the model.
This mode provides real-time feedback as the script updates automatically in response to model changes. It saves time, especially with large models, by manually eliminating the need to click the Run button for updates.
However, the choice between Manual Mode and Automatic Mode depends on the task and the level of control you need over script execution. Consider the following when deciding which mode suits your needs:
| Mode | When to Use |
| Manual Mode | You need precise control over when the script runs.You’re testing or debugging and want to control each execution.You’re working on a large or complex model and want to save computational resources by avoiding unnecessary script runs.You’re making significant model modifications and prefer to adjust before executing the script. |
| Automatic Mode | You want the script to automatically update the model as changes are made, saving time and effort.You’re working with dynamic parameters or elements that require real-time updates.You need to keep your model synchronised with changes without manually running the script each time. |
With a solid understanding of Dynamo’s execution modes, you’re well-equipped to bring your first script to life.
Want to streamline your workflows and unfold the full potential of Revit?
BIM ASSOCIATES is your one-stop BIM Solution provider for Revit Architectural and Structural Solutions. They coordinate with your team to develop, record, and streamline the BIM Revit Model, along with the sheets, Bill of Quantities, and Bill of Materials, and clash coordination.
How to Create Your First Dynamo Script?
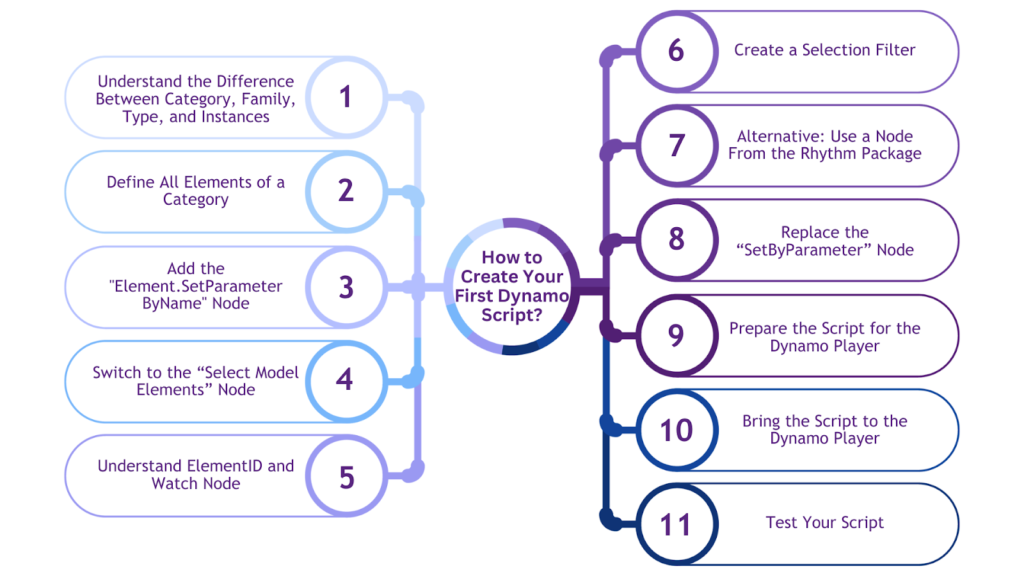
Dynamo offers a visual programming environment that allows you to build custom scripts by connecting nodes to perform specific functions. With its user-friendly interface, even individuals with little programming experience can easily create scripts to automate repetitive tasks, solve design challenges, and boost productivity.
Here’s a step-by-step approach to setting up your first script, from familiarising yourself with the interface to running your first automated task:
Step 1. Understand the Difference Between Category, Family, Type, and Instances
Before starting your script, it’s essential to understand the basic elements of Revit. The elements include:
- Category: A group of similar elements, such as walls, doors, or windows.
- Family: Defines the type of element, like a specific type of door or window.
- Type: Refers to different versions of a family, for example, a 36-inch door vs. a 48-inch door.
- Instance: Represents a single occurrence of an element in the model.
Understanding these terms will help you know which parameters and data to work with in your script.
Step 2. Define All Elements of a Category
You must define which elements you want to work with. For example, if you wish to modify door elements, you must first specify that you’re working with the “Doors” category.
To define elements, use the Categories node in Dynamo. This node lets you select the category of elements (e.g., Doors, Windows) you want to modify. Defining the category is essential because it filters the elements you wish to work with, ensuring the script targets the correct items.
Step 3. Add the “Element.SetParameterByName” Node
Once you’ve defined the category of elements you want to work with, the next step is manipulating their parameters. The Element.SetParameterByName node in Dynamo is a powerful tool that allows you to change the parameter values for the selected elements.
You just need to connect the elements (e.g., doors) and the parameters you want to modify (e.g., width, height) to this node. The node requires the element ID, parameter name, and the value you want to set.
Step 4. Switch to the “Select Model Elements” Node
To interact with specific elements in your Revit model, you need to select them. The Select Model Elements node lets you manually or programmatically choose Revit elements for manipulation.
This node allows you to visually select elements in the Revit model for your Dynamo script to act upon. You can link it with the Element.SetParameterByName node to set parameters for the selected elements.
Step 5. Understand ElementID and Watch Node
The ElementID is a unique identifier assigned to each element in the Revit model. It’s essential when working with Dynamo, as it helps you target specific elements for manipulation.
You can use the Element.ID node to extract the ElementID of the selected elements. This ensures the script targets the correct element.
In addition, the Watch node allows you to inspect the data output, such as the ElementID or parameter values. It displays the results of the operation in real-time, helping you debug and refine the script.
Step 6. Create a Selection Filter
If you want to filter elements based on specific criteria (e.g., selecting only doors with a certain size), you can use the Selection Filter node. This node helps narrow your selection by applying element type or size conditions.
For instance, you can filter to modify only doors that exceed a certain width. The filter applies this rule to the selection, ensuring you only work with the relevant elements.
Step 7. Alternative: Use a Node From the Rhythm Package
Sometimes, the default nodes in Dynamo may not provide the functionality you need. In these cases, you can use a node from the Rhythm Package, which offers additional, advanced features.
Install the Rhythm Package from the Dynamo Package Manager and add a node like Element.SetParameterByName from Rhythm. This may offer enhanced functionality compared to the standard version.
Step 8. Replace the “SetByParameter” Node
When working with parameter values, you may come across the SetByParameter node, which is used for setting element parameters. However, this node may be outdated or limited in functionality, depending on your version of Dynamo.
To replace it, you can use the Element.SetParameterByName node. This offers more flexibility and supports various parameters and element types.
Step 9. Prepare the Script for the Dynamo Player
The Dynamo Player allows you to run scripts directly within Revit without opening the full Dynamo interface each time. To prepare your script for the Dynamo Player, you must simplify the user interface and ensure all necessary inputs are included.
Clearly define all inputs within the script, such as parameter names, values, or elements. You can also use input nodes, like sliders or value inputs, to easily modify parameters without accessing the code.
Step 10. Bring the Script to the Dynamo Player
Once your script is ready, you can load it into the Dynamo Player. To do this, save your script and load it into the player. In Revit, go to Manage > Dynamo Player. Click Open, select your saved script, and click Play to run it.
Step 11. Test Your Script
Before deploying your Dynamo script in a real project, it’s crucial to test it thoroughly. Run the script on a small section of the model or use a sample project to verify its functionality. Further, adjust input values, modify parameters, and use the Watch node to monitor the results, ensuring the changes are applied correctly.
Testing your script is just the beginning. To refine your Dynamo skills and make your scripts even more powerful, it’s helpful to explore some basic programming techniques that can enhance your ability to solve complex problems and improve script efficiency.
Basic Programming Techniques in Dynamo
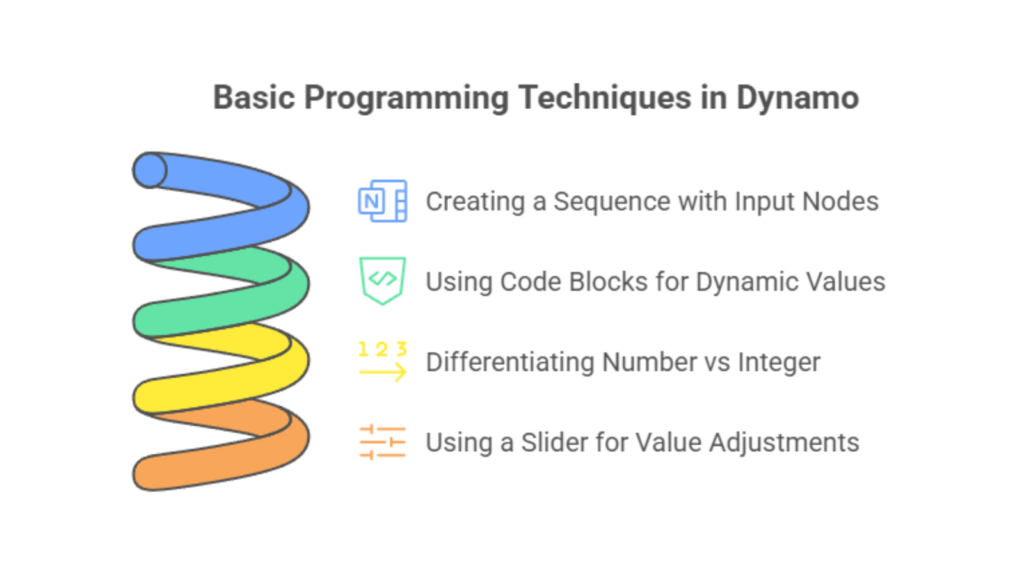
Although Dynamo uses a node-based system, understanding basic programming techniques can help you create more effective scripts and gain better control over your workflows. The four essential programming techniques in Dynamo are as follows:
1. Creating a Sequence with Input Nodes
In Dynamo, a sequence is a series of numbers or values used to create patterns, place elements, or perform specific operations. One of the easiest ways to create a sequence is by using input nodes:
- Number Slider: Use the Number Slider node to define a range of numbers and adjust values interactively. It allows you to pick a numerical value within a specified range.
- Range: The Range node is another helpful tool for creating sequences. It lets you generate a list of numbers starting from a given value and increasing at a specified interval up to a defined limit.
For example, if you want to place elements every 2 units along a path, you can create a sequence from 0 to 10 with a step of 2. The resulting sequence is [0, 2, 4, 6, 8, 10], which can be used to position objects or create repetitive geometry.
2. Using Code Blocks for Dynamic Values
Code Blocks are a powerful feature in Dynamo that allows you to define and calculate values dynamically within your script. They contain expressions, variables, or functions that help set parameters or define complex relationships between script parts.
For example, you can use built-in math functions directly within a code block:
a = 9;
b = Math.Sqrt(a);
Here, a is assigned the value 9, and b is calculated as the square root of a using the Math.Sqrt function, resulting in b being 3.
One of the key advantages of utilising code blocks is their dynamic nature. For example, if the value of x changes, y will automatically update to reflect the new value. This makes it easier to create parametric designs and automate complex calculations within your Dynamo script.
3. Differentiating Number vs Integer
In Dynamo, it’s essential to understand the difference between the Number and Integer types to ensure correct data handling in your script. Although both represent numerical values, they behave differently, especially when performing mathematical operations or working with specific nodes.
A number in Dynamo refers to floating-point numbers, which can include decimal places. These represent continuous values, such as measurements or scaling factors—for example, 3.14, 2.5, 0.75.
On the other hand, an Integer is a whole number without decimal places. They are typically used for counts, index values, or whole numbers in the model, such as the number of items or levels. Example: 1, 2, 3, 100
Certain nodes may require one value type over another—for example, the List.GetItemAtIndex node, which retrieves an item from a list at a specific position, usually expects an integer for the index. In this case, using a number instead of an integer could lead to errors or unexpected behaviour.
If necessary, you can convert numbers and integers using Math.round node to round a number to the nearest integer. Alternatively, you can use Integer nodes to ensure the correct data type is applied.
4. Using a Slider for Value Adjustments
The Slider node is one of the most commonly used input nodes in Dynamo, offering an easy and interactive way to control values within your script. To create a slider, drag the Number Slider node into the workspace. Further, you can define a minimum, maximum, increment, and initial value.
The slider allows users to adjust the value within the specified range by dragging the handle. As the value changes, it updates in real time and can be fed into other nodes to adapt your script’s behaviour.
Using these tools, you can begin automating tasks, creating parametric models, and experimenting with designs within Revit. This gives you greater control over your projects and workflows. These basic techniques will form the foundation for more complex scripting strategies as you advance.
As you become more comfortable with these foundational techniques, organising and managing your Dynamo scripts effectively will be key to scaling your efforts.
Organising and Managing Dynamo Scripts
As you create more complex scripts in Dynamo, organisation becomes essential to keep your scripts manageable, clear, and efficient. The proper organisation saves time and ensures that others working with the script can easily understand its functionality and make necessary changes. The steps and tips to organise and manage your scripts are as follows:
1. Create Notes for Better Understanding
Adding notes to your Dynamo scripts is a simple but effective way to enhance clarity and maintainability. Notes help explain the purpose of each section of the script, provide context for complex nodes, or remind you of design intentions and constraints. To add notes,
- Note Nodes: Dynamo provides a built-in Note node that allows you to add text comments directly into the workspace. Search for the Note node in the Nodes Library and drag it into the workspace to add a note.
- Connecting Notes: You can place a note next to a group of nodes or specific nodes to explain their function. Notes are free-floating, so you can position them anywhere in the workspace without affecting the functionality of the nodes.
If your script includes complex calculations, logic, or functions, use notes to clarify how they work, or if it has multiple sections (e.g., one for creating geometry, another for modifying parameters), use notes to label these sections.
2. Group Nodes with Colour-Coding for Organisation
As your script becomes larger and more complex, keeping track of which nodes belong together or serve a specific purpose can be challenging. One effective way to manage this is by grouping nodes and using colour-coding to organise your script visually.
To Group and use colour-code nodes, do the following:
- Select Nodes to Group: Select the related multiple nodes (e.g., all nodes for geometry creation or those that modify parameters).
- Group Nodes: After selecting the nodes, right-click and choose “Group.” This will craft a box around the selected nodes, visually indicating they belong to the same group.
- Colour Code the Group: Right-click the group box and select “Change Colour.” Choose a colour that visually connects the group to a specific task (e.g., red for geometry, blue for parameters, and green for outputs).
Always group the nodes based on their role within the script. In addition, apply a consistent colour scheme that is easy to remember. For instance, use blue for input nodes, orange for processing nodes, and green for output nodes. Remember to add titles to each group to explain their purpose.
3. Additional Tips for Organising Scripts
Organising your Dynamo scripts effectively is key to maintaining clarity, efficiency, and scalability as your projects become more complex. A well-organised script is not just easier to manage, but it also enhances collaboration and reduces the risk of errors.
Here are some additional tips to help you organise your scripts:
- Use “Watch” Nodes for Debugging: To monitor the output of different sections of your script, use Watch nodes, which display data in real time.
- Clean Up the Workspace: Organise your nodes logically (e.g., left to right or top to bottom) to ensure smooth data flow from one section to the next.
- Keep It Modular: Break large scripts into smaller, reusable components (such as custom nodes or subroutines).
Organising your script will save time in the long run, making modifications, debugging, and sharing a smoother process. While Dynamo’s node-based system is powerful on its own, sometimes using Python scripting can make a significant impact.
Power of Python Scripting with Dynamo for Fast Design
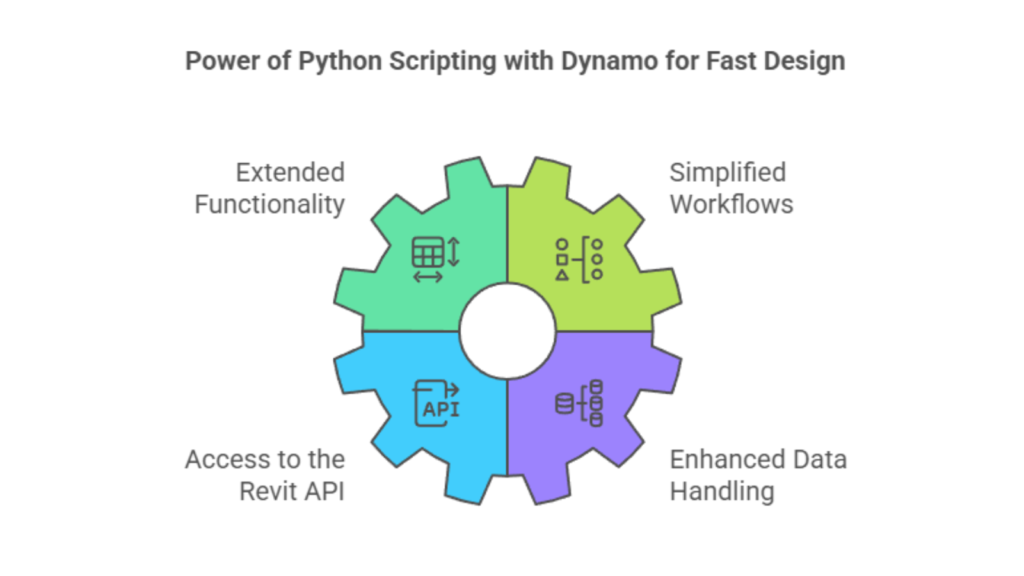
Python scripting in Dynamo enhances its capabilities by enabling advanced logic and functionality beyond the standard visual programming nodes. Incorporating Python into your Dynamo scripts opens up new possibilities for faster and more efficient design automation. It helps in:
- Extended Functionality: Python can do many things that Dynamo’s built-in nodes can’t, such as advanced data manipulation, custom algorithms, and integration with other software tools.
- Simplified Workflows: A single Python script or small code snippet can achieve the same result more efficiently, reducing display clutter and making script management and debugging easier.
- Access to the Revit API: Python allows direct access to the Revit API, enabling more advanced actions and customisations within a Revit model, bringing it closer to real-world requirements.
- Enhanced Data Handling: Python excels at handling complex data structures and conducting queries on large volumes of data, making it ideal for data analysis, optimisation, and automation tasks.
With Python, you can perform complex calculations, integrate external libraries, and create custom workflows tailored to specific design requirements. BIM Supports GREEN EARTH.

Conclusion
Creating your first Dynamo script for Revit is more than just a technical achievement. It’s a journey to simplified workflows, increased productivity, and endless design possibilities.
Learning the components, workflow, and functionality of Dynamo scripts will set you on the path to becoming a more efficient and creative Revit user. As you experiment with different nodes and refine your scripts, you’ll see how Dynamo can revolutionise your design process, making it faster, more accurate, and customised to your needs.
Are you looking for BIM solutions?
BIM ASSOCIATES is your one-stop BIM Solution provider for Architecture and Structure discipline. Their solutions help clients with better decision-making, cost-saving, efficient construction planning, and green earth initiatives.
You might also like: Understanding What is BIM 360 (BIM Collaboration Pro) and How It is Different: A Guide.
FAQs (Frequently Asked Questions)
1. What is the Dynamo script in Revit?
Dynamo script is a visual programming tool designed to be accessible to non-programmers and programmers. It allows users to visually script behaviour, defines custom logic, and write code using different programming languages.
2. Where to find Dynamo scripts?
You can access the Dynamo scripts in the Sample Files folder within your Alias installation directory.
3. How is Dynamo used with Revit?
Dynamo is called a graphical programming interface that allows you to customise your building information workflow. It is an open-source visual programming platform installed as part of Revit along with Revit-specific programming nodes.